Sunday, November 4, 2012

Housewarming and House-warming

Last night Al and I hosted a Housewarming Party to celebrate having our home with our friends and neighbors.  Last weekend we hosted a party for our Czech and Slovak friends.  Why we chose to do a party two weekends in a row, I'm not sure, but we had a great turn-out for both occasions and had a blast with those who came.  Having a house not only allows us to share our space with others but it allows us to do something we love:  having parties and showing people a good time.  We have such great friends and neighbors!

Gulas made in our backyard over a fire pit last weekend!  Yum yum!

In front of our "Prague Wall" - a tribute to happy memories!

This past week the temperatures have remained primarily in the 50's during the day, dropping to the mid-30's in the evening.  Naturally, the house has been cold as we don't run the heat so much.  After a few nights of freezing our tails off, we rolled out the electric radiator heater for the downstairs we decided to give our fireplace a go.  There was a fireplace in the house we lived in until I was four.  I have memories of wrapping up in a towel after a bath and sitting in front of the fire, the heat radiating on my back until it got too hot.  I'm not so fussed about sitting in front of the fire anymore, but it is so fun to finally have a fireplace again!  

We began our fire-lighting adventures with whatever we had available.  Some wood logs, a few sticks from out in the yard, and a magazine.  Let me just say magazines are horrible for lighting a fire.  Beautiful, but just silly.  They burn in different colors but don't hold a flame.  Also, we learned that we can't put too much wood on the rack to begin with - not enough air-flow.  After a failed attempt, we decided to wait until we were better prepared.  

Fire-lighting adventure #1 = failure.  Fire-lighting adventure #2 started with one of those wax, sawdust, and resin log thingys.  We put the log on the rack, lit the bag and voila! - we had a fire.  Not hot and lasted for 2 hours.  Fire #3 combined wood and  a small chunk of the fake log thingy, which we used to get the wood going.  It worked really well and the fire was not only hot, but beautiful.  I think we've got it now.  All we need to do now is get a truck-load of firewood in so we can stop getting it from Lowe's.

Fire-lighting adventure #2


The beauty of a fire, the warmth it provides and the smells that come from the smoldering wood all contribute to a cozy home.  Having a house full of people we enjoy makes it even cozier!


Sunday, October 21, 2012

Project Cold Frame

We have had a hiccup in our plans to continue building up Chez Reece as Al got laid off from his job just over a week ago.  Aside from being unnerved by the unknown, we are fortunate to have good heads on our shoulders, a beautiful place to live and the creativity to make the most of what we have.

This weekend has been a perfect example of how you can do what you need to do with little money and extras.  The mache seedlings have been growing for around a month and they will soon be ready to transfer to a cooler area, at least during the day.  Mache is a leafy green sometimes called "Lamb's Lettuce" or "Corn Lettuce".  I have two varieties of seeds, one of which grows during the winter months the other during the spring and summer.

Leafy greens and other "delicate" vegetables are best grown in colder temperatures in a cold frame.  The frame allows the plants to grow outside without being subjected to frost and/or snow.  It also keeps the soil at a reasonable growing temperature throughout the winter.  Some plants like broccoli, brussel sprouts and cabbages grow well without a cold frame but we will have to wait until next fall and winter season to try those!  We have seven broccoli plants that have been growing in containers on our deck, but we are going to try to transplant them to the cold frame or to another bed (as an experiment) soon.

Yesterday we began our cold frame project by searching the back part of our property for fallen trees.  We were mainly looking for straight poles about 2 inches in diameter and at least 10 feet long.  In addition to collecting wood for this particular project, we cleaned out a bit of the wooded area, found lots of logs that would be perfect for winter fires in the fireplace or over a fire pit in the backyard, and will serve as trellises and garden stakes in the spring.

Poles were selected, de-branched and cut to size with a bow saw.  The frame ended up measuring 10 x 3.5, which hopefully won't be too wide to reach into it.


We laid out the logs and began binding them together with twine.  We tried long nails but our hammering skills weren't really up to par and the twine looked so old school funky that it seemed the easier option.  The 10 ft. poles were supported across with subsequent poles and we left the back two times longer than the front to make it easy to bend over to cultivate the soil and pick plants when it's time.


When the frame was constructed, we spent a total of $11 for some construction plastic and began wrapping the frame and securing it with a staple gun.  After using materials found around the house I could justify spending $11 on the plastic.  Plus, we have lots more for future projects!  We made sure that there were no holes at the "seams" and tried to make it as snug as possible.


The top of the frame is simple and can be opened and closed easily - but will need two people, one on each side.  On the tall side of the frame we reinforced the plastic and stapled it to the top pole.  The other end of the top was secured to another long pole which rests on the frame.  Because of the curve of the wood we used there is a little gap, but we will handle that at another time.  Two forked sticks will be used to keep the top open during the day.


Anyway, all in all it's not the prettiest but should serve a purpose until we can get something a little more modern.  I'm quite proud of my engineering skills and Al's ability to forage the woods for useful materials.


Tuesday, September 25, 2012

Thoughts for Today

I've had on my mind recently the affect that living away from town has had on me.  Although we now have a commute, I get up early everyday, and we are nowhere near any bar or public transport, I think that moving into this house has already begun to produce positive results.

I've not really lazed about on weekends nor have I been able to slow down.  I'm still calmer, more patient at work (which is a big one if you know what I do), and more energized to get things done even if I'm tired.  My new-found youth I attribute to having a home.  Finishing something around the house or in the yard is equivalent to finishing a crafty project.  It's a tangible result that I can see and show.  Perhaps it's the knowledge that we are staying put for at least a few years or maybe it's just being away from the bulk of society after work.  In truth, you never know what life throws at you but this concept at least makes me happy.

Our house is slowly coming together and I hope to have many more guests in the future!  For now we continue to make our plans and find a way to make them work.  It's a little bit about time, a little bit about money, and lot of dreaming.  That's it for today!


Tuesday, September 18, 2012

The Deck is Finished!

I spent all of last week staining our back deck which is 140 square feet and included many spindles.  It's also about 10 feet off the ground.  We decided to use a clear protectant from Lowe's - Olympic Maximum.  It costs about $33 a gallon which is similar to the better Olympic paints.  The steps to staining a deck are quite simple and in retrospect I did it by myself and wasn't really overwhelmed.  Just make sure you give yourself plenty of time.

Before picture of the deck.
Step 1:  Choose a Stain.  Pick a week with no rain in the forecast.
Originally we went for a Toner stain which contains not only a protectant but a bit of color as well.  Toner stain also gives you an extra year of coverage (4 years instead of 3).  We chose the "Cedar Naturalwood" color but it appeared a bit too red for my tastes.  I would strongly recommend testing the stain in an inconspicuous area before you begin your project.  Had I just jumped in I would have been seriously disappointed.  

Step 2:  Clean Your Deck.
If your deck has any darker areas or mildew it's better if you clean it first.  Ours wasn't too bad but it felt wrong to skip this step.  We used a Lowe's brand deck cleaner which didn't require any scrubbing.  Just slap it on with a mop or sponge or something and in 5-10 minutes you have a beautifully clean deck!  We used an old magic eraser mop.  It dissolved a bit and couldn't reach every nook and cranny but it saved us money on buying a sprayer - which you could also use (apparently).


Step 3:  Let Your Clean Deck Dry for 12, 24, or more hours...
Our deck was dry pretty quickly and despite the Lowe's Lady's advice, who said you had to wait 3 days, I started staining on Monday having cleaned on Saturday.  

Step 4:  Begin Staining.
I started with our railings, the one's with all the spindles.  What a pain!  I used a brush which gave me more control but due to the height of the deck I had to reach over to stain the back of the spindles... my back was not happy.  Because I used a clear protectant it was possible to do smaller sections without getting a striped effect or spots.  I would imagine if you had any color you would have to have a more seamless application - so a sprayer might come in handy.

Step 5:  Give the stain 12-24 hours to soak in and settle.  Enjoy!
I was racing against the downpour that was forecasted for today so I actually finished up on Sunday.  Already the water is beading!  I am very happy with the results and can't wait to show it off.

Not too much color!  All finished!

Honza's favorite Yoga pose:  Downward Dog.  He's such a natural!


Sunday, September 9, 2012

Autumn is Upon Us!

Living in the country is something that I have daydreamed about for awhile but actually doing it was still very abstract until we bought our house.  It is only in the past few weeks that I have really absorbed what it means to be removed from city-life.  Friday "lazy" nights are now reduced to "oh, I can't be bothered to drive all that way for take-out", so we just eat at home, and because things "need doin" I am on the go pretty much every weekend now.  Although I spent a large part of my life in a city and loved it, I think at heart I'm actually a country girl.  I've been so relaxed each weekend, forgetting about the stresses of work and the annoyance of TV.  Today I actually sat on the front porch, admired the beautiful blue sky and drank lemonade.  We opened the windows and enjoyed fresh air.  Out here I am close enough to enjoy city-life when I want, but I'm also closer to nature and the calm that nature brings.

This weekend was particularly uplifting and productive as we had two neighbors contribute to Chez Reece.  One neighbor offered to mow some grass on his way up to check his mail.  Not twenty minutes later he was cruising down the road on his riding mower.  A couple of hours later the whole front yard had been mowed and trimmed up with the weedeater.  I helped by pulling up weeds and unwanted grass while Al re-planted some herbs that were wasting away in the used coffee cans.  Please note:  Chock-ful of Nuts is a great coffee, but the cans do not make good containers for gardening.  The metal rusts on the inside and out and will kill your plants.  Thank goodness sage and thyme are hearty herbs!  Whilst out in the yard two of our other neighbors stopped by and left us with an amazing flower arrangement.  This after they had already supplied us with a bag of fresh shitake mushrooms and a jar of honey at the Saturday market - all products from their farm.  We will definitely be writing more on these neighbors as they are a wonderful resource and just really great people!

Since the weather report is looking good for the next 8 days, we began the first step in staining the back deck.  We moved everything to the front porch or garage and began using the bleach-like cleaner. This Olympic cleaner was applied with a used mop, a great idea from Al, and went to work right away on our mildew-stained deck.  Mind, the sponge on the mop dissolved a bit but I don't think it'll make a difference.  In a couple of days we will be able to begin applying the actual stain.  We've chosen Olympic Maximum toner in "Cedar Naturaltone".  It looks a bit dark to me, but Al really likes it so we might be stuck with it.


This is a photo before cleaning.  The brush broom didn't work as planned but the tub was perfect for dipping the mop into.  It took the whole container of cleaning solution to clean our 140 square foot deck.


These Mache seeds are meant to be planted in September or October and will be ready to harvest in January through March.  As Mache is one of my favorite greens I'm really excited about these!  We need to get a cold frame built and ready to go soon - but I'll leave that for another post.


These two pots contain Blue Flax seeds.  Blue Flax is a perennial that grows mostly green the first season and then blooms beautiful purplish-blue flowers in the second and subsequent seasons.  I hope to get these little seeds going then transplant them to our yard in the spring.


This grow light set-up was given to my classroom for a project last spring.  The children each planted flower seeds and were able to watch them grow.  Since we aren't using it at school right now, I thought I'd bring it home and put it to work.  The set-up uses a wood frame for the base and four "slats" of cut moulding which are screwed into the base.  Four clamps hold two slats on the vertical slats which are connected to the base.  I used some old yarn to hold the lights in place and each light is plugged into a power strip which will make it easy to turn on and off.  It is also possible to raise and lower the lights as needed by adjusting the slats and clamps.  I am hopeful that we've done something right.  There is a lot of trial and error in gardening - what a boost it would be to have some successful plants on our first try!

All in all, it's been a wonderful weekend and I've enjoyed being outside.

And here's little Honza because he is so cute!


Sunday, August 26, 2012

Breaking Ground

It started with a stake out, as in staking out 3 plots of 5 feet by 12 feet to become the first raised beds in our garden. Stake outs in this part of Virginia are hard work, especially when the soil is packed clay and solid from months of incessant heat. Thankfully though the temperatures from the height of summer have started to cool off and have been accompanied by increasing amounts of rain. Yesterday it rained for a soild 10 hours, most of which time I spent at the Virginia Craft Brewers Festival hosted by Devils' Backbone, where I was judging beer.

When it rains so heavily our garden becomes a mass of rivulets of water heading toward the lowest point of the neighbourhood, it also makes the top few inches of the soil moist enough to actually get stuck into it, without getting stuck in it. That's what we did this morning, started clearing the grass out of the plots, most of which came up with plenty of roots and hence got transplated to parts of the garden needing some greenery.


As you can kind of see from the picture, we got one plot completely done with, de-grassed and forked over, as well as making a start on plot two. Eventually when all three plots are broken up, we'll build the wooden frames which will keep in the soil. I am planning to have the frames be at least 8 inches high, so that we can dump in plenty of manure and compost to sit over the winter and get rotted in. Come spring next year the plan is to have beds with a good growing medium for crops of beans, tomatoes and whatever else we will grow to cut down on our grocery bill.


While we have only 3 beds at the moment, the long term plan is to expand out to at least 10 for vegetables, as well as a few plots for fruit bushes and trees, in particular I want to try my hand at growing that most magnificent of fruit, the gooseberry.

Sunday, August 19, 2012

Happy Homemaking

Today is the end of my summer.  Tomorrow I begin the routine of getting up at 6 Monday through Friday and working until 4 or 5.  Tomorrow I begin the time of the year when I come home exhausted and ready to plop myself down on the couch.  It's been a great summer and although my "summer" comes to a close tonight when my head touches that pillow, I can say that I've done everything that I wanted to do.  I even worked three weeks at summer camp.

When I wasn't at work, we moved into our house, I made sure the house was clean, that dinner was on the table every night, and that I finished various projects like putting up pictures on the walls, organizing random things around the house and working on crafty stuff.  The main goal of this summer was to get settled enough in the house to feel comfortable and well... settled!  I accomplished that.

This weekend I made sure to finish up any loose ends, doing any work that might be a pain later when I've been all day on my feet.  I practically locked myself indoors last week finishing up a quilt that I began over a year ago.  I learned how to make the Pineapple Blossom Scrappy Quilt at a workshop awhile back and still had 10 blocks to construct.  Not only did I finish the blocks but I pieced all 20 together, put the sashing and border on it and began hand quilting it!

So far 4 out of 20 quilt blocks have been quilted.

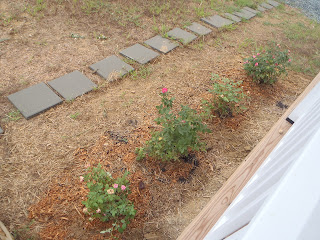
I also had four pink Knock-Out roses that I bought about a month ago that were finally ready to be put in the ground.  Despite the rain that we've had this past week, the ground was not forgiving and I thought I was going to have to get some serious machinery to dig four measly holes for these things.  Our clay soil isn't going to be the easiest to "fix up" and I think landscaping is going to be a slow and laborious task.  Three blisters, and aching body and reduced energy stores later I had my roses planted - and boy do they look nice.  The aches and pains of digging in cement-like soil is definitely worth it!

Not a great view but I didn't want to get wet and muddy to take this pic!


We had plans to begin digging out the rectangles where the first of our raised beds will be but it decided to rain all day.  I'm disappointed we weren't able to get a start on it, but secretly relieved -now I can rest!  Instead I began this morning by making Lemon Bars and after a trip to Wal-Mart, I made a successful batch of 30-Minute Mozzarella!  It was probably the best mozzarella we've ever had.  I can't wait to share it with others tomorrow!

This 30-Minute Mozzarella recipe came from "The Backyard Homestead" by  Carleen Madigan
It's our go-to guide for all things self-sufficient!


All in all, I've had a great time being Mrs. Happy Homemaker this summer.  Just because I go back to the grind tomorrow doesn't mean I'll stop, it just means I'll have to slow down.  Despite not having the option to sleep in or stay up late, I'll be glad to be back in a routine.  We've got a lot of work ahead of us and just in time for cooler temperatures and little to no humidity!

And here's Honza because he's so cute!

Monday, August 6, 2012

Homemade Basil Pesto

Summertime is perfect for making and eating basil pesto.  It's light, rich and full of flavor, and because basil grows really well in the sunny, steamy summer months in Virginia, you should have plenty to spare to make a couple jars of pesto, leaving enough on your plant to use later.

Basil pesto is commonly used for pasta dishes but Al and I rarely eat pasta, so it's used more for bread dipping in our house.  You can also spread pesto on your morning bagel, put a little on baked fish, or use it in risotto.  If you're allergic to nuts, don't worry because pesto can be made nut-free too!

The ingredients are simple as is making it.  I would say that a food processor or chopper is important as it makes the process much easier.  I for one have never made it without and having made other things by hand, I can tell you it's probably best left if you don't have some way of rapidly chopping/mixing the basil.  However, you don't need a state of the art processor to do this!  Mine is a hand-me-down from a friend and is tiny.

The following ingredients are needed:


Basil (duh!)
Parmesan and/or Romano Cheese, shredded
Garlic, 2-4 cloves depending on your taste
Olive Oil, I use light tasting oil
Pine Nuts, optional
Salt and Pepper, to taste


1.  Begin by "pruning" your basil plant.  I like to cut my basil right above two opposite stems to encourage the plant to bush out.  Pick off all the leaves big and small and gently rinse them in cold water.  I read somewhere that authentic Italian pesto is made using only the small baby leaves of the plant.  I assume the purpose is to get a sweeter flavor, however most won't notice the difference if bigger leaves are used - I don't.

2.  Put your clean basil leaves into the processor.  Don't be afraid to pack them in a bit.  Add about a tablespoon of oil and begin blitzing the leaves.  Every so often take a spatula and clear the sides of the processor to make sure it all gets mixed in.

3.  Add another tablespoon of oil and begin adding Parmesan/Romano one to two spoonfuls at a time.  I really like the Homestyle 4C grated Parmesan/Romano cheese found in jars in the refrigerated cheeses at your local shop.  It has a really strong flavor and is fresh without the cost of buying it in the deli section.


4.  Continue adding cheese until the pesto looks like it has white-ish specks throughout.  This is the time to add nuts if you wish.  You may want to add another tablespoon of oil at this time as well.  The pesto should be a soft consistency but not too runny.  I personally like the flavor that pine nuts give to the pesto.  They are expensive in my opinion, but worth the expense and they go a long way.  Only a handful or so of nuts is needed.


5.  Add salt and pepper to taste.


This batch made one half pint jar and one teeny tiny jar...


For those of you who get freaked out by cooking without specific measurements, here is a good place to start:
2 cups fresh basil, packed
1/3 cup Parmesan/Romano cheese
2-4 cloves of garlic, crushed or minced
1-2 handfuls of Pine Nuts, optional
salt and pepper, to taste

Variations:
Some claim to have used Walnuts or Almonds instead of Pine Nuts.  I imagine you can do this, although I have never personally used anything other than Pine Nuts.

I would imagine you could also make pastes or pestos from other herbal plants like rosemary, sage, thyme, and perhaps even parsley, or mix all together for an herbal pesto!

Enjoy!


Saturday, August 4, 2012

Getting All 'Erbal

The first post for the Country Boy part of this duo.

The most exciting part of having joined the landed bourgeoisie is just that, being "landed". Sure an acre and a half doesn't compare to the estate of Earl Granville back home in the Outer Hebrides, but for me, it is plenty to be going on with. When we started our hunt for a home I had wild fantasies of rearing pigs, sheep and chickens, growing all my own fruit and veg, and generally never going to the shop again. I am sure that anyone that has been to the average Walmart has felt the same longing never to enter the mouth of retail Hades with the octogenerian Cerberus saying "welcome to Hell...sorry Walmart" again.

Having had to rein in my dreams, we have made a modest start on our future garden in terms of turning our deck into a herbarium, and please do pronounce the "h", it would be rude to ignore it entirely. With the aid of a few planters, which us Brits call "window boxes", some terracotta pots and even some coffee cans, we now have the beginnings of herby happiness.


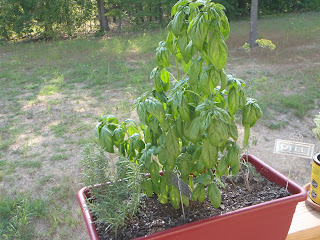
We have had the first planter for quite some time now, as you can see from the picture the basil is going nuts, so much so that Mrs V (as I lovingly call the missus) will be making pesto tomorrow. Also in the planter is my favourite herb, rosemary, which happens to be one of my favourite girls' names, and another herb that gets used alot in our house, dill.

Today though we added four more pots to the deck, a couple of traditional terracotta pots and a couple made from the large coffee cans in which we get our morning Joe. To make the coffee cans usable as pots I punctured a load of holes into the bottom for drainage. We bought the herbs themselves at our local farmers' market in Charlottesville, having decided to just wander around after breakfast. The herbs we bought, in order of the pictures below are sage, thyme, garlic chives and lemon verbena, which is completely new to me but which has a phenomenal lemon aroma that apparently is good in marinades, jams and jellies.


Eventually we will start work on building raised beds and trellises for the fruit and vegetables, but for the time being it is good to have a green, edible deck.

Thursday, August 2, 2012

Where Do We Begin?

We've been in the house almost a month now.  The master bedroom and bathroom along with the spare upstairs bathroom have been painted and "decorated", and I have just now begun to hang some pictures and begin to organize our lives here.  Other than daily memory loss and general forgetfulness, the transition has been smooth and we are happily settling in.  Owning a home for us has been several years in the making and now we finally have the ability to begin to put together our ideas and make something of them.  But where to start?  Prioritizing is obviously important yet proving very difficult.

Here's what we have come up with so far (not necessarily in this order):
1. Fence in a portion of the back yard.
2. Begin building and preparing raised beds for a garden.
3. Re-seed the at least the front lawn.
4. Plant some trees.
5. Landscape the front of the house.
6. Build a back patio.
7. Build a chicken coop.

The chicken coop is a long-term project.  I plan on re-purposing wood from discarded pallets and will obviously need time to collect all of it.  Plus, I'm not in a hurry to get chickens at this time.  I've done a little research on the type of coop I would like to build and have drawn up a few ideas of my own.  I've found that coops can range from very simple to really chic.  Ideally I would like a mix of both - simple chic.

I like the enclosed rectangular run on this one and the overall size.

This is more what I would like to do - construct the coop from used pallets. One like this would be modified to have an enclosed run to protect the hens from predators.


A backyard fence would be wonderful as it would deter wild animals, enclose our garden, and would provide Honza a huge space to run around in.  We are surrounded by farms, many of which have farm fencing.

  
This would be ideal but we have no idea what a fence like this would cost.


As for trees, I would love a cherry tree and crepe myrtle in the front yard.  We have located a person in our area that is selling plum trees for $3 each.  Perhaps we will get a couple of those.


It can be overwhelming to think about all of this at one time, but I have to remind myself that this is just the beginning.  Rome wasn't built in a day!

Sunday, July 8, 2012

Adventures in Moving and Satellite

This has been an eventful week. Last Sunday my parents arrived from South Carolina to help out with packing and moving. On Tuesday the movers came to take all of our big items, which wasn't very much - enough to fill the smallest U-Haul truck. I called around Charlottesville to find the best deal. AAA Movers charged me $25 less than others and were also very nice and careful with our things. As far as the heat goes, it was probably the worst week to move. Everyday this past week has been in the upper 90's or low 100's. Thank goodness it wasn't us doing the moving... oh wait, we still had car-load after car-load of random crap.

I love a move for the simple reason that it allows you to truly see how many unneccessary things you have. Or, in our case to see what bad dusters we are! The apartment looks like a dingy dungeon compared to our new home. Dusty, dark, dirty, used. The remainder of the week was spent unpacking, cleaning, painting and doing other random jobs. Thanks to my Dad we now have faux-wood blinds (from Home Depot )along the whole front of the house. They have already proved to be a necessity. Next time they come we will do the back of the house ;+)

Master Bedroom

Upstairs Living Room


I have been handling all of this change fairly well and it wasn't until yesterday that I had a moment of weakness. Friday was spent twiddling my thumbs whilst waiting for the Direct TV installer to come and set-up. He never came. It turns out he had had am all-day nightmare of an install on Friday that required using bum equipment and many drilled holes. Thankfully the poor guy called yesterday morning and came to set up yesterday afternoon. At the same time, our Wild Blue satellite internet guy was setting up his dish. Anyway, Direct TV had to drill a hole through our wall and now we have two satellite dishes outside. All for being connected! Yay. Now to get used to all of those wires and dishes! 


Our set-up... not so bad.
I suppose country living requires that we make sacrifices.  They look like eyes don't they?


Curtis (from Direct TV) did a fabulous job and entertained us with his bold sense of humor the whole time. Gotta love a 20 year Navy veteran who goes into installing satellite dishes. It was refreshing to have someone carry on like a sailor! Otherwise, I think I would've had a breakdown - this week's events were heavy and the thought of someone drilling into our new wall was stressing me out. 


He did a nice job.  Apparently, it's the "butt-plug" that gives it this clean look.  I think I'll put a plant in front of this!

The guest bathroom turned out beautifully. All it needed was about 3 coats of paint. "Dovetail" blue is elegant but bold and looks nice against the bright white trim and bath. The blinds also look great! Thanks Dad and Mom for your DIY skills. Oh, and never underestimate the power of paint splatter! Goof-Off is great for that... careful on the light switch plates though - it eats right through ;+) Not an expensive mistake though, thankfully.


Can anyone spot the carboy? 

Friday, June 29, 2012

The "Audi Fridge", The "Twins" and Grass...

Since I spoke so much about it on my last post I thought it best to show you why it is the Audi Fridge... Why Audi, I don't know - it's just something we made up.


I always wanted "twins"

Doo-doo-do-do!  Dingle doo-doo-doo!


I went over first thing this morning to water the grass as it was deemed that today would be blazin'.  And considering that we haven't really done any watering yet (I know, tisk tisk), I thought today would be a good day to start.  From my experience today I discovered that we have a heavy clay type soil and the water pressure is decent but not enough to cover the most area when watering the grass.  Oh, and it was hot today.  Did I mention it was hot?  Here's what the grass is looking like right now in the back yard.  I forgot to photo the front... it's a little more pitiful.  Frankly, I'm worried about the little sprouts.  May have to ask for wisdom from the lawn-gods... whoever they might be.


and here's Honza - because he's so cute... he's been feeling neglected lately.